HappyPose
Toolbox and trackers for object pose-estimation. Based on the work CosyPose and MegaPose. This directory is currently under development. Please refer to the documentation for more details.
Installation
To install happypose, you can use pip or uv.
We strongly suggest to install it in either a venv or a conda environment.
Example with conda
git clone --branch dev --recurse-submodules https://github.com/agimus-project/happypose.git
cd happypose
conda env create -f environment.yml
conda activate happypose
pip install -r requirements/base.txt
With conda, you must not install pypi, cpu or cu124 extras or requirements files.
Example with uv
git clone --branch dev --recurse-submodules https://github.com/agimus-project/happypose.git
cd happypose
uv sync --extra pypi --extra cpu  # you *must* choose between cpu / cu124
source .venv/bin/activate
Example with venv
git clone --branch dev --recurse-submodules https://github.com/agimus-project/happypose.git
cd happypose
python -m venv .venv
source .venv/bin/activate
pip install -r requirements/pypi.txt -r requirements/cpu.txt  # you *must* choose between cpu / cu124
Install extras:
pypi: install pinocchio & opencv from PyPI (don't use this with conda)cpu: install torch for CPU from wheel (don't use this with conda)cu124: install torch for CUDA 12.4 from wheel (don't use this with conda)
Create data directory
Create data dir /somewhere/convenient. The dataset to store are quite large.
export HAPPYPOSE_DATA_DIR=/somewhere/convenient
Test the install
With CPU/GPU
Download CosyPose model weights specific to the hope dataset
python -m happypose.toolbox.utils.download --cosypose_models \
            detector-bop-hope-pbr--15246 \
            coarse-bop-hope-pbr--225203 \
            refiner-bop-hope-pbr--955392
or download MegaPose model weights (works with all datasets)
python -m happypose.toolbox.utils.download --megapose_models
and the examples
python -m happypose.toolbox.utils.download --examples barbecue-sauce
In the HappyPose folder:
pytest -v ./tests
You may need to install pytest-order : pip installp pytest-order. In this case, test related to the evaluation and the training of CosyPose are not run. If you want to use these functionalities, you need a GPU.
Only if GPU (cuda) is available
Tests related to evaluation and training will be run if a GPU is available. Hence, a few more downloads are needed :
#ycbv models
python -m happypose.toolbox.utils.download --cosypose_models \
            coarse-bop-ycbv-pbr--724183 \
            refiner-bop-ycbv-pbr--604090
python -m happypose.toolbox.utils.download --bop_dataset ycbv
python -m happypose.toolbox.utils.download --test-results
The tests take much longer in this case.
CosyPose: Consistent multi-view multi-object 6D pose estimation
Yann Labbé,
Justin Carpentier,
Mathieu Aubry,
Josef Sivic
ECCV: European Conference on Computer Vision, 2020
[Paper]
[Project page]
[Video (1 min)]
[Video (10 min)]
[Slides]
Winner of the BOP Challenge 2020 at ECCV'20 [slides] [BOP challenge paper]
Citation
If you use this code in your research, please cite the paper:
@inproceedings{labbe2020,
title= {CosyPose: Consistent multi-view multi-object 6D pose estimation}
author={Y. {Labbe} and J. {Carpentier} and M. {Aubry} and J. {Sivic}},
booktitle={Proceedings of the European Conference on Computer Vision (ECCV)},
year={2020}}
News
- CosyPose is the winning method in the BOP challenge 2020 (5 awards in total, including best overall method and best RGB-only method) ! All the code and models used for the challenge are available in this repository.
- We participate in the BOP challenge 2020. Results are available on the public leaderboard for 7 pose estimation benchmarks. We release 2D detection models (MaskRCNN) and 6D pose estimation models (coarse+refiner) used on each dataset.
- The paper is available on arXiv and full code is released.
- Our paper on CosyPose is accepted at ECCV 2020.
This repository contains the code for the full CosyPose approach, including:
Overview
Single-view single-object 6D pose estimator
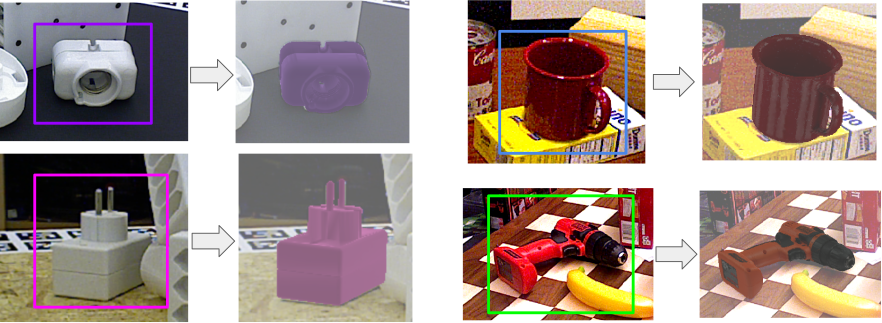
Given an RGB image and a 2D bounding box of an object with known 3D model, the 6D pose estimator predicts the full 6D pose of the object with respect to the camera. Our method is inspired by DeepIM with several simplifications and technical improvements. It is fully implemented in pytorch and achieve single-view state-of-the-art on YCB-Video and T-LESS. We provide pre-trained models used in our experiments on both datasets. We make the training code that we used to train them available. It can be parallelized on multiple GPUs and multiple nodes.
Synthetic data generation
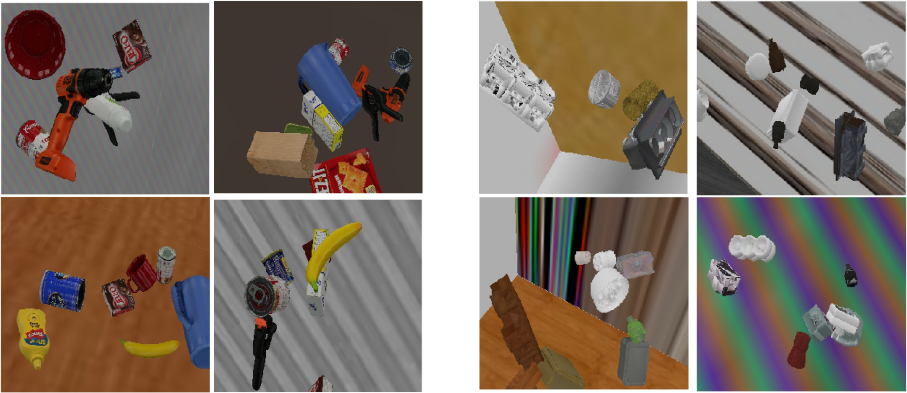
The single-view 6D pose estimation models are trained on a mix of synthetic and real images. We provide the code for generating the additional synthetic images.
Multi-view multi-object scene reconstruction
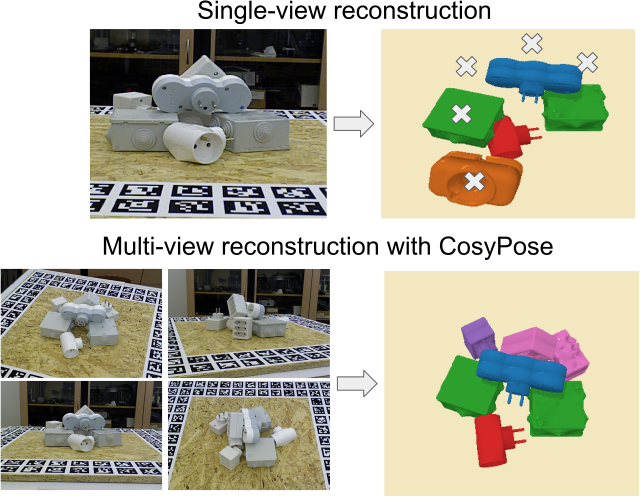
Single-view object-level reconstruction of a scene often fails because of detection mistakes, pose estimation errors and occlusions; which makes it impractical for real applications. Our multi-view approach, CosyPose, addresses these single-view limitations and helps improving 6D pose accuracy by leveraging information from multiple cameras with unknown positions. We provide the full code, including robust object-level multi-view matching and global scene refinement. The method is agnostic to the 6D pose estimator used, and can therefore be combined with many other existing single-view object pose estimation method to solve problems on other datasets, or in real scenarios. We provide a utility for running CosyPose given a set of input 6D object candidates in each image.
BOP challenge 2020: single-view 2D detection + 6D pose estimation models

We used our {coarse+refinement} single-view 6D pose estimation method in the BOP challenge 2020. In addition, we trained a MaskRCNN detector (torchvision's implementation) on each of the 7 core datasets (LM-O, T-LESS, TUD-L, IC-BIN, ITODD, HB, YCB-V). We provide 2D detectors and 6D pose estimation models for these datasets. All training (including 2D detector), inference and evaluation code are available in this repository. It can be easily used for another dataset in the BOP format.
Main entry points
This repository is divided into different entry points
- Inference:
run_cosypose_on_example.pyis used to run the inference pipeline on a single example image. - Evaluation:
run_full_cosypose_evaluation.pyis ued to first run inference on one or several datasets, and then use the results obtained to evaluate the method on these datasets. - Training:
run_detector_training.pyis used to train the detector part of Cosypose.run_pose_training.pycan be used to train thecoarsemodel or therefinermodel.
In this repository, the version provided of CosyPose is different to the one of the original repository. In particular, we switched the 3D renderer from PyBullet to Panda3d. Thus, the results obtained may differ from the one reported in the original paper and repository.
Downloading and preparing the data
All data used (datasets, models, results, ...) are stored in a directory $HAPPYPOSE_DATA_DIR that you created in the Readsme. We provide the utilities for downloading required data and models. All of the files can also be downloaded manually.
BOP Datasets
For both T-LESS and YCB-Video, we use the datasets in the BOP format. If you already have them on your disk, place them in $HAPPYPOSE_DATA_DIR/bop_datasets. Alternatively, you can download it using :
python -m happypose.toolbox.utils.download --bop_dataset ycbv tless
Additional files that contain information about the datasets used to fairly compare with prior works on both datasets.
python -m happypose.toolbox.utils.download --bop_extra_files ycbv tless
We use pybullet for rendering images which requires object models to be provided in the URDF format. We provide converted URDF files, they can be downloaded using:
python -m happypose.toolbox.utils.download --urdf_models ycbv tless.cad
In the BOP format, the YCB objects 002_master_chef_can and 040_large_marker are considered symmetric, but not by previous works such as PoseCNN, PVNet and DeepIM. To ensure a fair comparison (using ADD instead of ADD-S for ADD-(S) for these objects), these objects must not be considered symmetric in the evaluation. To keep the uniformity of the models format, we generate a set of YCB objects models_bop-compat_eval that can be used to fairly compare our approach against previous works. You can download them directly:
python -m happypose.toolbox.utils.download --ycbv_compat_models
Notes:
-
The URDF files were obtained using these commands (requires
meshlabto be installed):python -m happypose.pose_estimators.cosypose.cosypose.scripts.convert_bop_ds_to_urdf --ds_name=ycbv python -m happypose.pose_estimators.cosypose.cosypose.scripts.convert_bop_ds_to_urdf --ds_name=tless.cad -
Compatibility models were obtained using the following script:
python -m happypose.pose_estimators.cosypose.cosypose.scripts.make_ycbv_compat_models
Models for minimal version
# hope
python -m happypose.toolbox.utils.download --cosypose_models \
          detector-bop-hope-pbr--15246 \
          coarse-bop-hope-pbr--225203 \
          refiner-bop-hope-pbr--955392

# ycbv
python -m happypose.toolbox.utils.download --cosypose_models \
          detector-bop-ycbv-pbr--970850 \
          coarse-bop-ycbv-pbr--724183 \
          refiner-bop-ycbv-pbr--604090

# tless
python -m happypose.toolbox.utils.download --cosypose_models \
          detector-bop-tless-pbr--873074 \
          coarse-bop-tless-pbr--506801 \
          refiner-bop-tless-pbr--233420
Pre-trained models for single-view estimator
The pre-trained models of the single-view pose estimator can be downloaded using:
# YCB-V Single-view refiner
python -m happypose.toolbox.utils.download --cosypose_models ycbv-refiner-finetune--251020

# YCB-V Single-view refiner trained on synthetic data only
# Only download this if you are interested in retraining the above model
python -m happypose.toolbox.utils.download --cosypose_models ycbv-refiner-syntonly--596719

# T-LESS coarse and refiner models
python -m happypose.toolbox.utils.download --cosypose_models tless-coarse--10219 tless-refiner--585928
2D detections
To ensure a fair comparison with prior works on both datasets, we use the same detections as DeepIM (from PoseCNN) on YCB-Video and the same as Pix2pose (from a RetinaNet model) on T-LESS. Download the saved 2D detections for both datasets using
python -m happypose.toolbox.utils.download --detections ycbv_posecnn

# SiSo detections: 1 detection with highest per score per class per image on all images
# Available for each image of the T-LESS dataset (primesense sensor)
# These are the same detections as used in Pix2pose's experiments
python -m happypose.toolbox.utils.download --detections tless_pix2pose_retinanet_siso_top1

# ViVo detections: All detections for a subset of 1000 images of T-LESS.
# Used in our multi-view experiments.
python -m happypose.toolbox.utils.download --detections tless_pix2pose_retinanet_vivo_all
If you are interested in re-training a detector, please see the BOP 2020 section.
Notes:
- The PoseCNN detections (and coarse pose estimates) on YCB-Video were extracted and converted from these PoseCNN results.
- The Pix2pose detections were extracted using pix2pose's code. We used the detection model from their paper, see here. For the ViVo detections, their code was slightly modified. The code used to extract detections can be found here.
Inference
Here are provided the minimal commands you have to run in order to run the inference of CosyPose on the barbecue-sauce example. You need to set up the environment variable $HAPPYPOSE_DATA_DIR as explained in the README.
1. Download pre-trained pose estimation models
#hope dataset detector
python -m happypose.toolbox.utils.download --cosypose_models \
            detector-bop-hope-pbr--15246 \
            coarse-bop-hope-pbr--225203 \
            refiner-bop-hope-pbr--955392
2. Download the example data
python -m happypose.toolbox.utils.download --examples barbecue-sauce
3. Run the script
The example contains default outputs for detection and pose prediction
python -m happypose.pose_estimators.cosypose.cosypose.scripts.run_inference_on_example barbecue-sauce --run-inference --run-detections --vis-detections --vis-poses
4. Results
The results are stored in the visualization folder created in the example directory.

CosyPose single view evaluation
Please make sure you followed the steps relative to the evaluation in the main readme.
To evaluate on YCBV dataset:
python -m happypose.pose_estimators.cosypose.cosypose.scripts.run_full_cosypose_eval_new detector_run_id=bop_pbr coarse_run_id=coarse-bop-ycbv-pbr--724183 refiner_run_id=refiner-bop-ycbv-pbr--604090 ds_names=["ycbv.bop19"] result_id=ycbv-debug detection_coarse_types=["detector"] inference.renderer=bullet inference.n_workers=0
To change the renderer from bullet (originally used by cosypose) to panda3d:
python -m happypose.pose_estimators.cosypose.cosypose.scripts.run_full_cosypose_eval_new detector_run_id=bop_pbr coarse_run_id=coarse-bop-ycbv-pbr--724183 refiner_run_id=refiner-bop-ycbv-pbr--604090 ds_names=["ycbv.bop19"] result_id=ycbv-debug detection_coarse_types=["detector"] inference.renderer=panda3d inference.n_workers=1
To evaluate on other datasets, change ["ycbv.bop19"] to e.g. ["tless.bop19"]. To evaluate on a collection of datasets, change "ycbv.bop19" to e.g. ["ycbv.bop19", "lmo.bop19", "tless.bop19"].
Train CosyPose
Disclaimer : This part of the repository is still under development.
Training the detector part of the pose estimation part are independant.
Training Pose Estimator
This script can be used to train both the coarse model or the refiner model.
python -m happypose.pose_estimators.cosypose.cosypose.scripts.run_pose_training --config ycbv-refiner-syntonly
Training Detector
python -m happypose.pose_estimators.cosypose.cosypose.scripts.run_detector_training --config bop-ycbv-synt+real
All the models were trained on 32 GPUs.
MegaPose
This repository contains code, models and dataset for our MegaPose paper.
Yann Labbé, Lucas Manuelli, Arsalan Mousavian, Stephen Tyree, Stan Birchfield, Jonathan Tremblay, Justin Carpentier, Mathieu Aubry, Dieter Fox, Josef Sivic. “MegaPose: 6D Pose Estimation of Novel Objects via Render & Compare.” In: CoRL 2022.
News
- 09.01.2023 We release two new variants of our approach (see the Model Zoo).
- 09.01.2023 Code, models and dataset are released in this repository.
- 10.09.2022 The paper is accepted at CoRL 2022.
Contributors
The main contributors to the code are:
- Yann Labbé (Inria, NVIDIA internship)
- Lucas Manuelli (NVIDIA Seattle Robotics Lab)
Citation
If you find this source code useful please cite:
@inproceedings{labbe2022megapose,
  title = {{{MegaPose}}: {{6D Pose Estimation}} of {{Novel Objects}} via {{Render}} \& {{Compare}}},
  booktitle = {CoRL},
  author = {Labb\'e, Yann and Manuelli, Lucas and Mousavian, Arsalan and Tyree, Stephen and Birchfield, Stan and Tremblay, Jonathan and Carpentier, Justin and Aubry, Mathieu and Fox, Dieter and Sivic, Josef},
  date = {2022}
}
Overview
This repository contains pre-trained models for pose estimation of novel objects, and our synthetic training dataset. Most notable features are listed below.
Pose estimation of novel objects
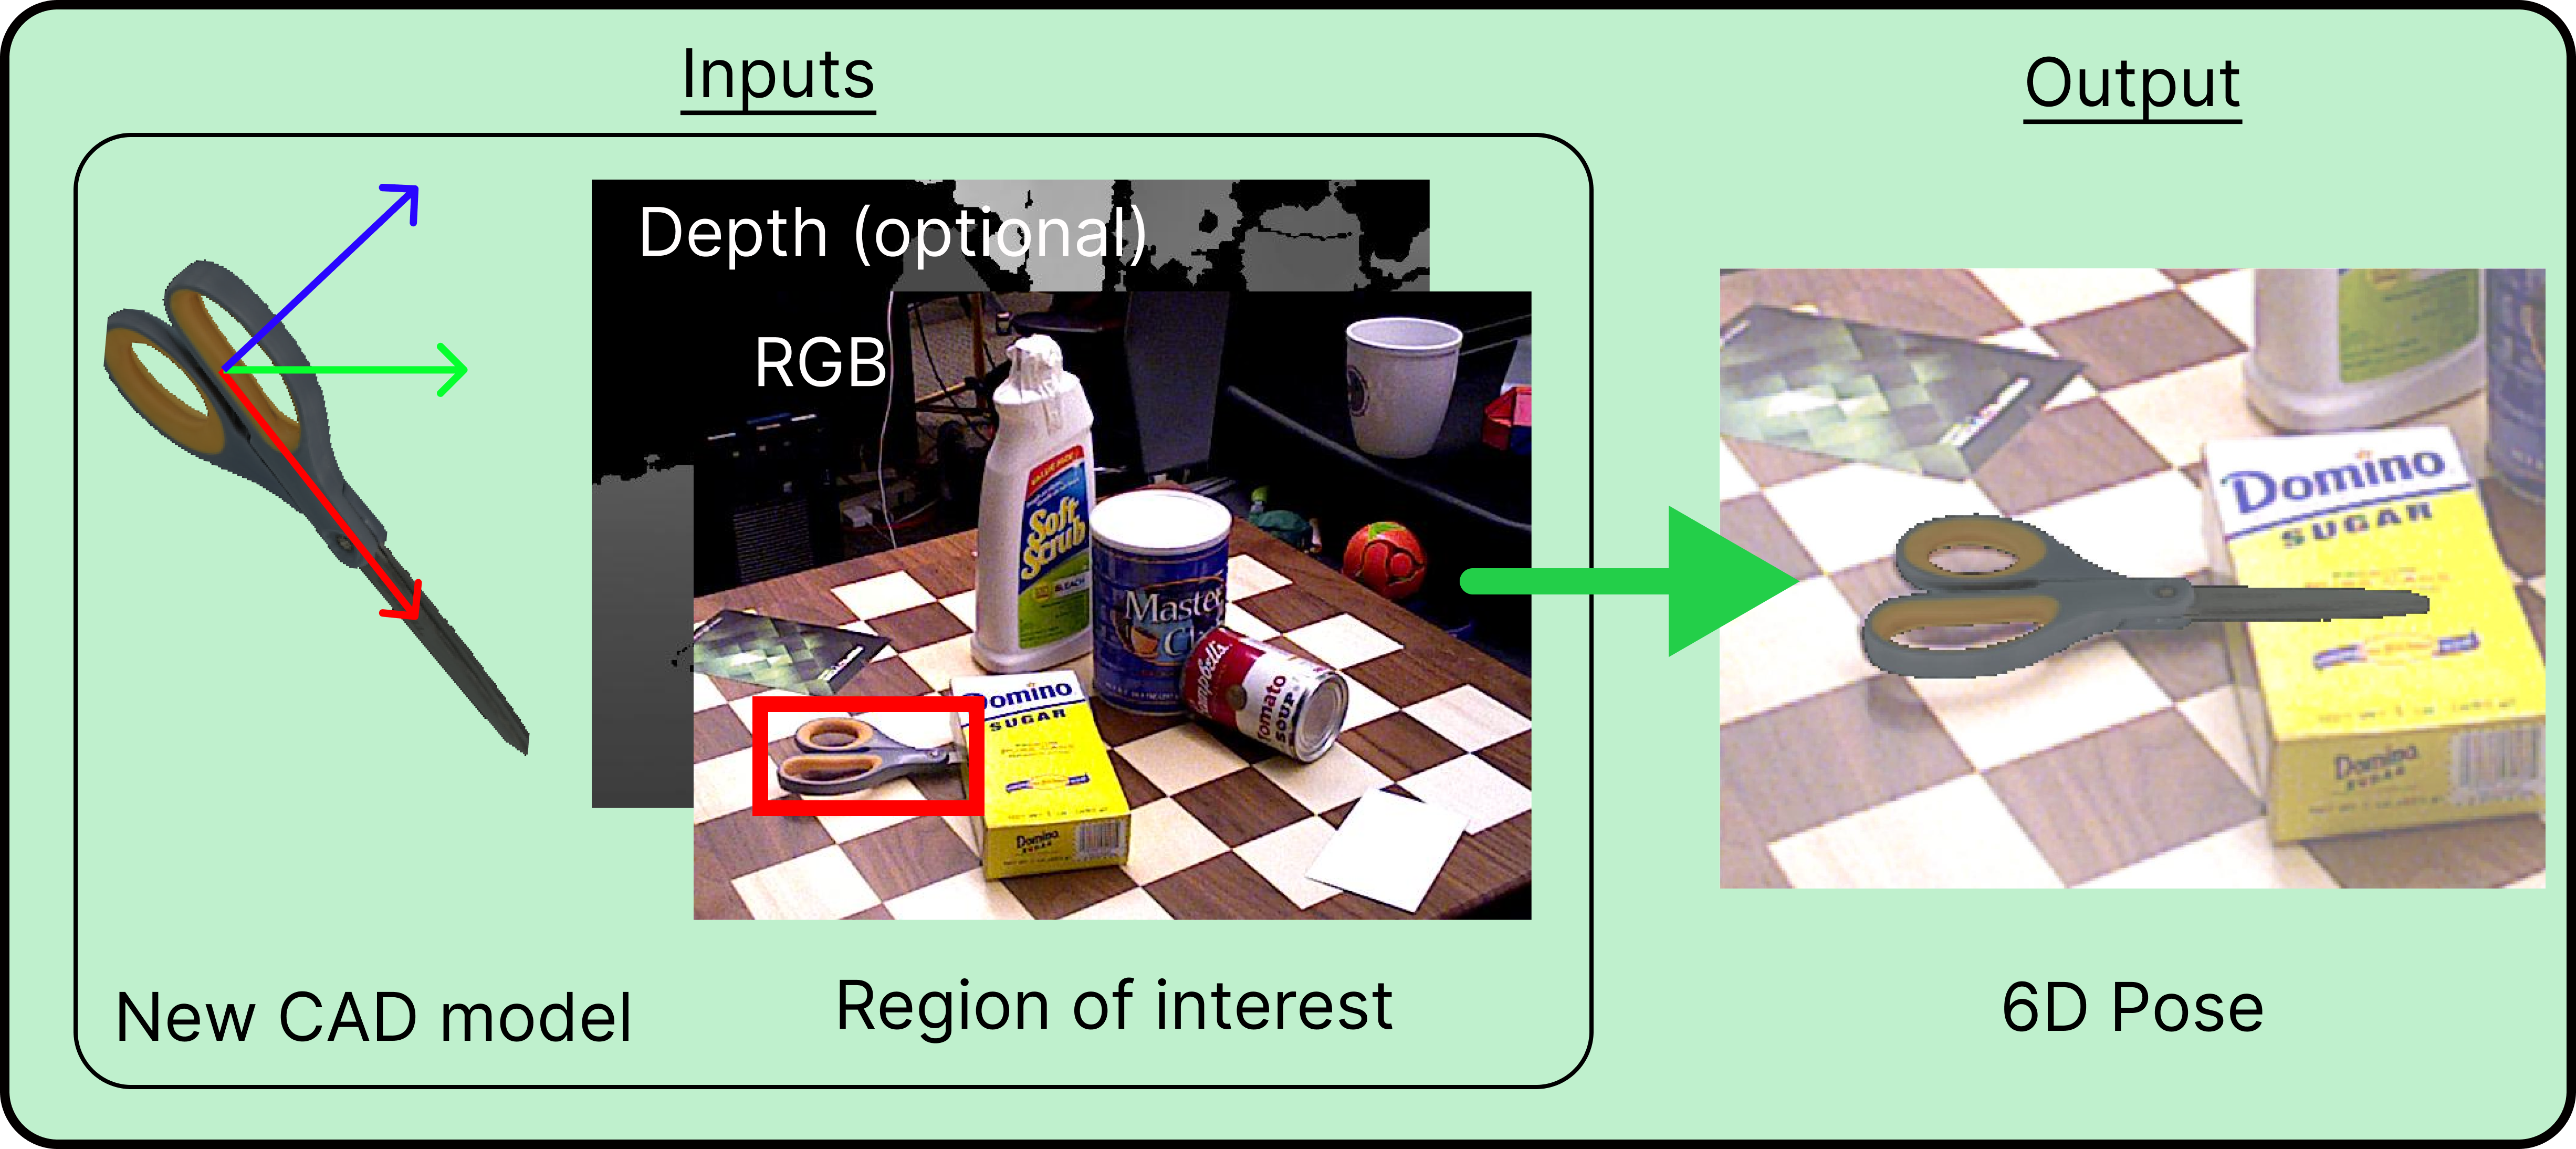
We provide pre-trained models for 6D pose estimation of novel objects.
Given as inputs:
- an RGB image (depth can also be used but is optional),
- the intrinsic parameters of the camera,
- a mesh of the object,
- a bounding box of that object in the image,
our approach estimates the 6D pose of the object (3D rotation + 3D translation) with respect to the camera.
We provide a script and an example for inference on novel objects. After installation, please see the Inference tutorial.
Large-scale synthetic dataset
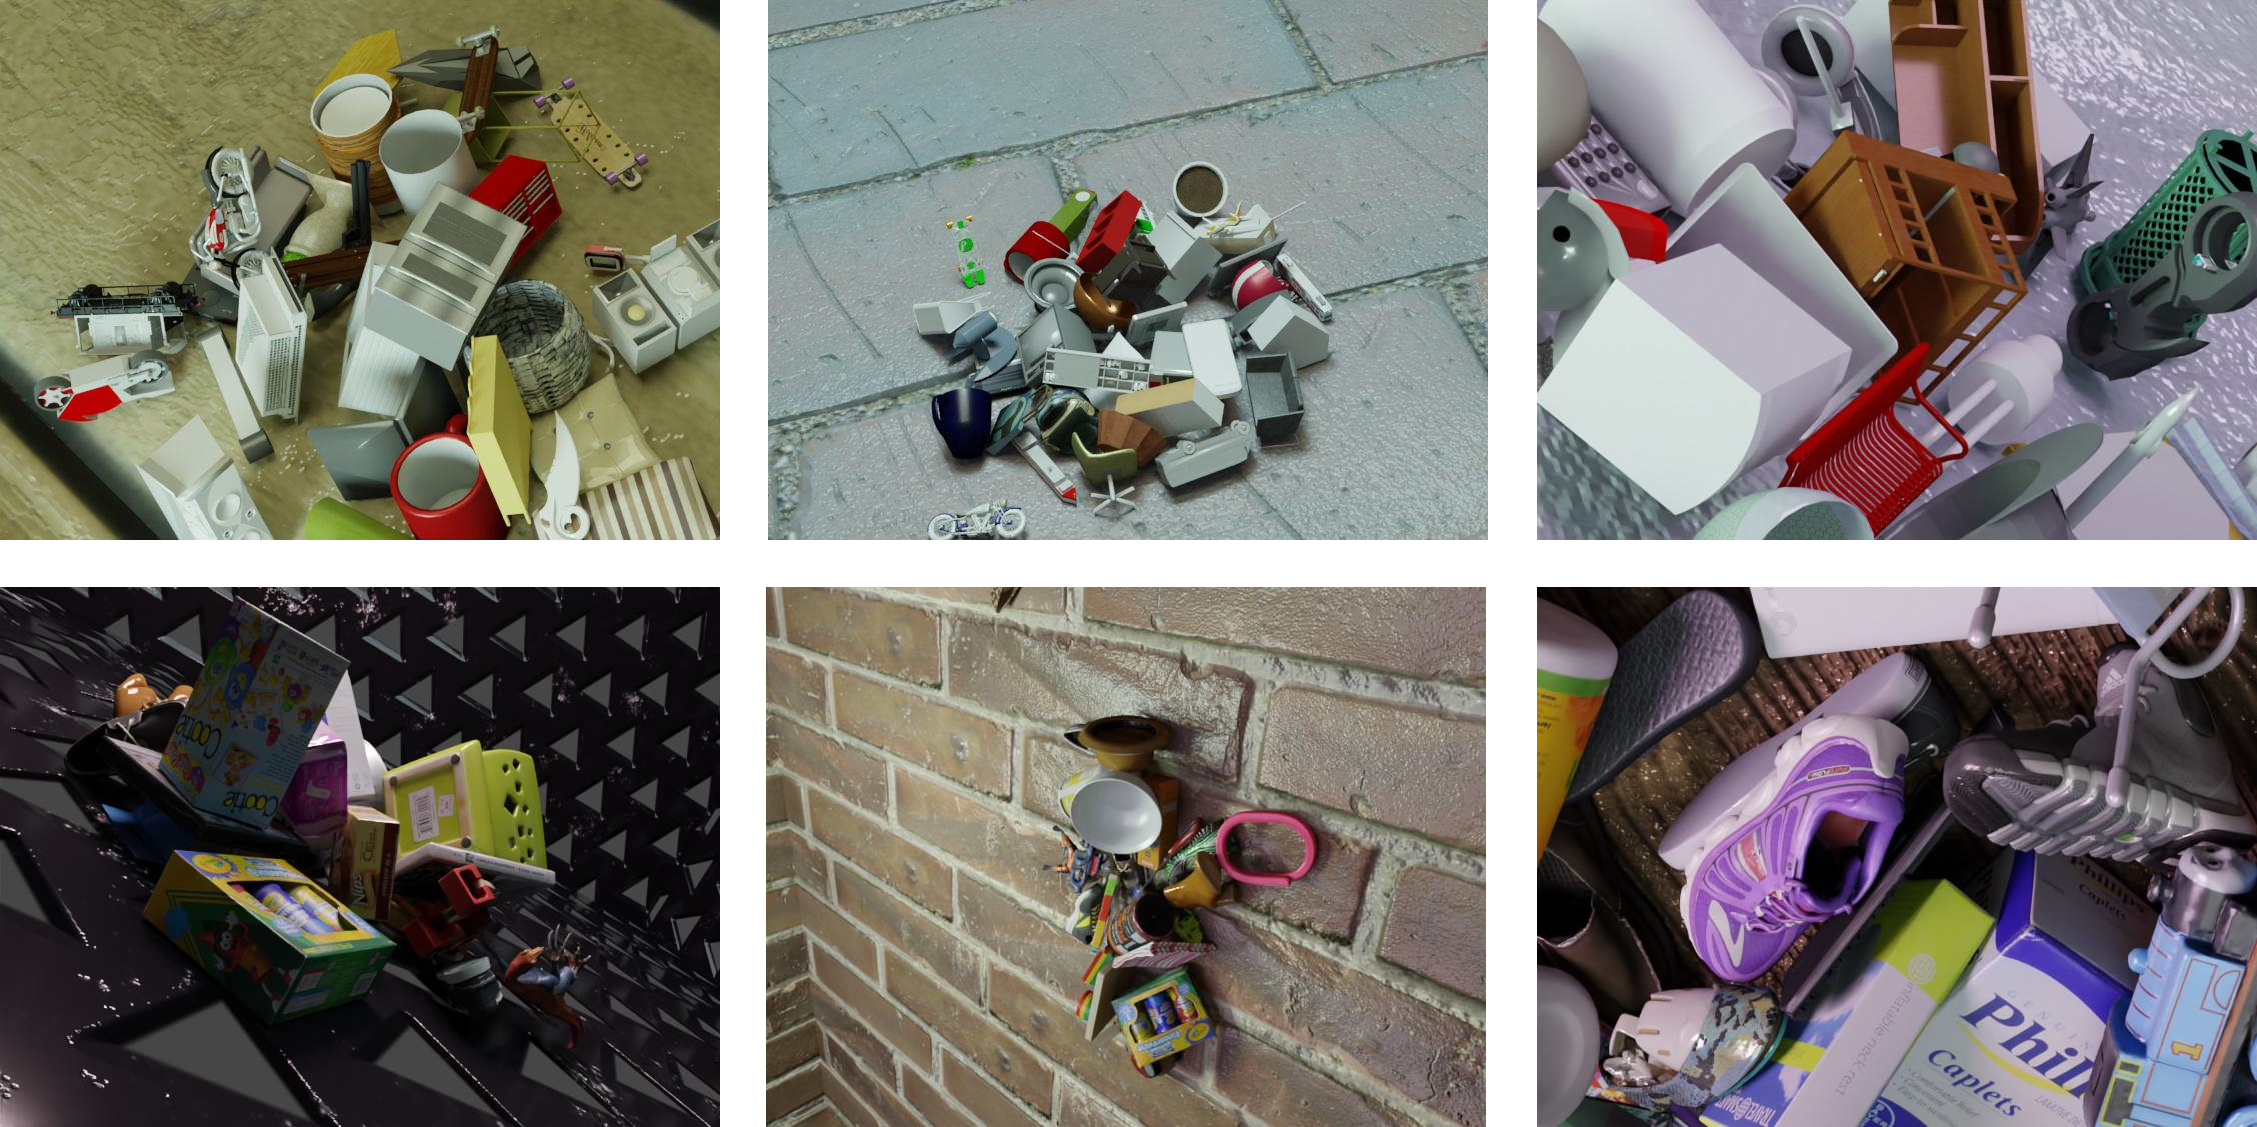
We provide the synthetic dataset we used to train MegaPose. The dataset contains 2 million images displaying more than 20,000 objects from the Google Scanned Objects and ShapeNet datasets. After installation, please see the Dataset section.
Main entry points
This repository is divided into different entry points
- Inference:
run_megapose_on_example.pyis used to run the inference pipeline on a single example image. - Evaluation:
run_full_megapose_eval.pyis ued to first run inference on one or several datasets, and then use the results obtained to evaluate the method on these datasets.
Model Zoo
| Model name | Input |
|---|---|
| megapose-1.0-RGB | RGB |
| megapose-1.0-RGBD | RGB-D |
| megapose-1.0-RGB-multi-hypothesis | RGB |
| megapose-1.0-RGB-multi-hypothesis-icp | RGB-D |
megapose-1.0-RGBandmegapose-1.0-RGBDcorrespond to method presented and evaluated in the paper.-multi-hypothesisis a variant of our approach which:- Uses the coarse model, extracts top-K hypotheses (by default K=5);
- For each hypothesis runs K refiner iterations;
- Evaluates refined hypotheses using score from coarse model and selects the highest scoring one.
-icpindicates running ICP refinement on the depth data.
For optimal performance, we recommend using megapose-1.0-RGB-multi-hypothesis for an RGB image and megapose-1.0-RGB-multi-hypothesis-icp for an RGB-D image. An extended paper with full evaluation of these new approaches is coming soon.
Download example data for minimal testing
cd $HAPPYPOSE_DATA_DIR
wget https://memmo-data.laas.fr/static/examples.tar.xz
tar xf examples.tar.xz
Download pre-trained pose estimation models
Download pose estimation models to $HAPPYPOSE_DATA_DIR/megapose-models:
python -m happypose.toolbox.utils.download --megapose_models
Download pre-trained detection models
Megapose can use pretrained detectors from CosyPose, which can be downloaded to $HAPPYPOSE_DATA_DIR/experiments:
# hope
python -m happypose.toolbox.utils.download --cosypose_models detector-bop-hope-pbr--15246
# ycbv
python -m happypose.toolbox.utils.download --cosypose_models detector-bop-ycbv-pbr--970850
# tless
python -m happypose.toolbox.utils.download --cosypose_models detector-bop-tless-pbr--873074
Dataset
Dataset information
The dataset is available at this url. It is split into two datasets: gso_1M (Google Scanned Objects) and shapenet_1M (ShapeNet objects). Each dataset has 1 million images which were generated using BlenderProc.
Datasets are released in the webdataset format for high reading performance. Each dataset is split into chunks of size ~600MB containing 1000 images each.
We provide the pre-processed meshes ready to be used for rendering and training in this directory:
google_scanned_objects.zipshapenetcorev2.zip
Important: Before downloading this data, please make sure you are allowed to use these datasets i.e. you can download the original ones.
Usage
We provide utilies for loading and visualizing the data.
The following commands download 10 chunks of each dataset as well as metadatas:
cd $HAPPYPOSE_DATA_DIR
rclone copyto megapose_public_readonly:/webdatasets/ webdatasets/ --include "0000000*.tar" --include "*.json" --include "*.feather" --config $HAPPYPOSE_DATA_DIR/rclone.conf -P
We then download the object models (please make sure you have access to the original datasets before downloading these preprocessed ones):
cd $HAPPYPOSE_DATA_DIR
rclone copyto megapose_public_readonly:/tars tars/ --include "shapenetcorev2.zip" --include "google_scanned_objects.zip" --config $HAPPYPOSE_DATA_DIR/rclone.conf -P
unzip tars/shapenetcorev2.zip
unzip tars/google_scanned_objects.zip
Your directory structure should look like this:
$HAPPYPOSE_DATA_DIR/
    webdatasets/
        gso_1M/
            infos.json
            frame_index.feather
            00000001.tar
            ...
        shapenet_1M/
            infos.json
            frame_index.feather
            00000001.tar
            ...
    shapenetcorev2/
        ...
    googlescannedobjects/
        ...
You can then use the render_megapose_dataset.ipynb notebook to load and visualize the data and 6D pose annotations.


Inference
Here are provided the minimal commands you have to run in order to run the inference of CosyPose. You need to set up the environment variable $HAPPYPOSE_DATA_DIR as explained in the README.
1. Download pre-trained pose estimation models
python -m happypose.toolbox.utils.download --megapose_models
2. Download the example
We estimate the pose for a barbecue sauce bottle (from the HOPE dataset, not used during training of MegaPose).
python -m happypose.toolbox.utils.download --examples barbecue-sauce
The input files are the following:
$HAPPYPOSE_DATA_DIR/examples/barbecue-sauce/
    image_rgb.png
    image_depth.png
    camera_data.json
    inputs/object_data.json
    meshes/hope-obj_000002.ply
    meshes/hope-obj_000002.png
-
image_rgb.pngis a RGB image of the scene. We recommend using a 4:3 aspect ratio. -
image_depth.png(optional) contains depth measurements, with values inmm. You can leave out this file if you don't have depth measurements. -
camera_data.jsoncontains the 3x3 camera intrinsic matrixKand the cameraresolutionin[h,w]format.{"K": [[605.9547119140625, 0.0, 319.029052734375], [0.0, 605.006591796875, 249.67617797851562], [0.0, 0.0, 1.0]], "resolution": [480, 640]} -
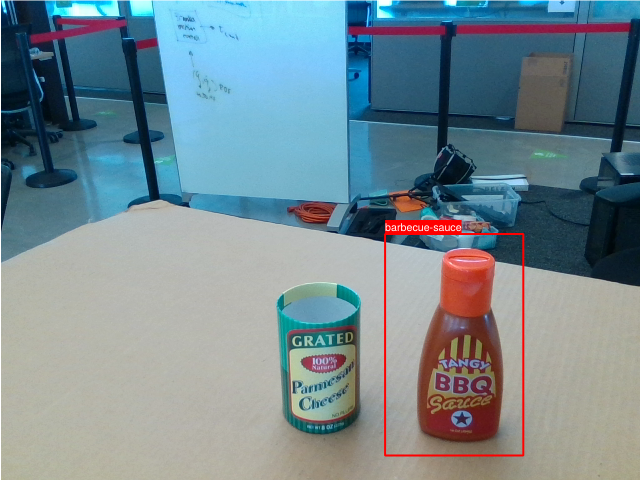
inputs/object_data.jsoncontains a list of object detections. For each detection, the 2D bounding box in the image (in[xmin, ymin, xmax, ymax]format), and the label of the object are provided. In this example, there is a single object detection. The bounding box is only used for computing an initial depth estimate of the object which is then refined by our approach. The bounding box does not need to be extremly precise (see below).[{"label": "hope-obj_000002", "bbox_modal": [384, 234, 522, 455]}] -
meshesis a directory containing the object's mesh. Mesh units are expected to be in millimeters. In this example, we use a mesh in.plyformat. The code also supports.objmeshes but you will have to make sure that the objects are rendered correctly with our renderer.
You can visualize input detections using :
python -m happypose.pose_estimators.megapose.scripts.run_inference_on_example barbecue-sauce --vis-detections
3. Run pose estimation and visualize results
Run inference with the following command:
python -m happypose.pose_estimators.megapose.scripts.run_inference_on_example barbecue-sauce --run-inference --vis-poses
by default, the model only uses the RGB input. You can use of our RGB-D megapose models using the --model argument. Please see our Model Zoo for all models available.
The previous command will generate the following file:
$HAPPYPOSE_DATA_DIR/examples/barbecue-sauce/
    outputs/object_data_inf.json
A default object_data.json is provided if you prefer not to run the model.
This file contains a list of objects with their estimated poses . For each object, the estimated pose is noted TWO (the world coordinate frame correspond to the camera frame). It is composed of a quaternion and the 3D translation:
[{"label": "barbecue-sauce", "TWO": [[0.5453961536730983, 0.6226545207599095, -0.43295293693197473, 0.35692612413663855], [0.10723329335451126, 0.07313819974660873, 0.45735278725624084]]}]
The --vis-poses options write several visualization files:
$HAPPYPOSE_DATA_DIR/examples/barbecue-sauce/
    visualizations/contour_overlay.png
    visualizations/mesh_overlay.png
    visualizations/all_results.png

Evaluating Megapose
Please make sure you followed the steps relative to the evaluation in the main readme.
Evaluating with Megapose detector
Run a detector part of Megapose pipeline to detect bounding boxes in the image dataset at run-time.
python -m happypose.pose_estimators.megapose.scripts.run_full_megapose_eval detector_run_id=bop_pbr coarse_run_id=coarse-rgb-906902141 refiner_run_id=refiner-rgb-653307694 ds_names=[ycbv.bop19,lmo.bop19,tless.bop19,tudl.bop19,icbin.bop19,hb.bop19,itodd.bop19,hope.bop19] result_id=detector_1posehyp detection_coarse_types=[["detector","SO3_grid"]] inference.n_pose_hypotheses=1 skip_inference=false run_bop_eval=true
Evaluating with external detections
First step: download external detections from bop website (such as default detections for task 1 and 4). You should have one csv file for every bop dataset. Place these in a directory of your choice and define the environment variable.
EXTERNAL_DETECTIONS_DIR = /path/to/saved/detections/
Megapose expects a json file named bop_detections_filenames.json placed in EXTERNAL_DETECTIONS_DIR mapping bop dataset names to the csv file names, e.g. for CNOS detection (default detection for task 4, bop23):
{
    "ycbv": "cnos-fastsam_ycbv-test_f4f2127c-6f59-447c-95b3-28e1e591f1a1.json",
    "lmo": "cnos-fastsam_lmo-test_3cb298ea-e2eb-4713-ae9e-5a7134c5da0f.json",
    "tless": "cnos-fastsam_tless-test_8ca61cb0-4472-4f11-bce7-1362a12d396f.json",
    "tudl": "cnos-fastsam_tudl-test_c48a2a95-1b41-4a51-9920-a667cb3d7149.json",
    "icbin": "cnos-fastsam_icbin-test_f21a9faf-7ef2-4325-885f-f4b6460f4432.json",
    "itodd": "cnos-fastsam_itodd-test_df32d45b-301c-4fc9-8769-797904dd9325.json",
    "hb": "cnos-fastsam_hb-test_db836947-020a-45bd-8ec5-c95560b68011.json"
}
To reproduce the results we obtained for the BOP-Challenge, please run the following commands :
# RGB 1 hyp
python -m happypose.pose_estimators.megapose.scripts.run_full_megapose_eval coarse_run_id=coarse-rgb-906902141 refiner_run_id=refiner-rgb-653307694 ds_names=[ycbv.bop19,lmo.bop19,tless.bop19,tudl.bop19,icbin.bop19,hb.bop19,itodd.bop19] result_id=exte_det_1posehyp detection_coarse_types=[["exte","SO3_grid"]] inference.n_pose_hypotheses=1 skip_inference=False run_bop_eval=true
Results :

# RGB 5 hyp
python -m happypose.pose_estimators.megapose.scripts.run_full_megapose_eval coarse_run_id=coarse-rgb-906902141 refiner_run_id=refiner-rgb-653307694 ds_names=[ycbv.bop19,lmo.bop19,tless.bop19,tudl.bop19,icbin.bop19,hb.bop19,itodd.bop19] result_id=exte_det_5posehyp detection_coarse_types=[["exte","SO3_grid"]] inference.n_pose_hypotheses=5 skip_inference=False run_bop_eval=true
Results :

# RGB-D 5 hyp
python -m torch.distributed.run  --nproc_per_node gpu -m happypose.pose_estimators.megapose.scripts.run_full_megapose_eval coarse_run_id=coarse-rgb-906902141 refiner_run_id=refiner-rgb-653307694 ds_names=[tless.bop19,tudl.bop19,icbin.bop19,hb.bop19,itodd.bop19] result_id=exte_det_5posehyp_teaserpp detection_coarse_types=[["exte","SO3_grid"]] inference.n_pose_hypotheses=5 inference.run_depth_refiner=true inference.depth_refiner=teaserpp skip_inference=False run_bop_eval=True
Results :

Example on Jean Zay supercalculator
In particular, for this challenge, we used Jean Zay, a french supercalculator. Here is a quick documentation, for additional information on who can use this calculator, please refer to the official documentation.
You need to create an account to log on Jean Zay : https://www.edari.fr/
To connect by ssh to Jean Zay using this account, you need to register the IP address of the machine you use to connect to Jean Zay. If you work in a french research laboratory, your laboratory probably have a bouncing machine that is registered.
Once you are connected to Jean Zay, you will have access to different storage space: $HOME, $WORK, $SCRATCH, $STORE. More details on Jean Zay website
You should store your code in $WORK and the data on $SCRATCH. Be careful, everything not used during 30 days on $SCRATCH is deleted.
Before following the regular installation procedure of HappyPose, make sur to load this module : module load anaconda-py3/2023.03
Then, you can follow the procedure in your current shell.
Once it is done, to run a job you need to use slurm. More detail on Jean Zay website.
Here are some examples of slurm scripts used during the project. To run a slurm script, use the following command : sbatch script.slurm. You can use the command sacct to see the state of your script. You can visualize the content of the logs using the command tail -f. For example to see the error logs, use tail -f logs/inference-happypose.err.
# inference.slurm
#!/bin/bash
#SBATCH --job-name=happypose-inference
#SBATCH --output=logs/inference-happypose.out
#SBATCH --error=logs/inference-happypose.err
#SBATCH --nodes=1                    # on demande un noeud
#SBATCH --ntasks-per-node=1          # avec une tache par noeud (= nombre de GPU ici)
#SBATCH --gres=gpu:1
#SBATCH --cpus-per-task=10
#SBATCH --hint=nomultithread
#SBATCH --account zbb@v100
#SBATCH --time=00:10:00

## load Pytorch module
module purge
module load module load anaconda-py3/2023.03
conda activate happypose

cd happypose
# Assuming you have downloaded the example and models
python -m happypose.pose_estimators.cosypose.cosypose.scripts.run_inference_on_example barbecue-sauce --run-inference
# python -m happypose.pose_estimators.megapose.scripts.run_inference_on_example barbecue-sauce --run-inference
# evaluation.slurm
#!/bin/bash
#SBATCH --job-name=happypose-evaluation-1H
#SBATCH --output=logs/evaluation-happypose-1h.out
#SBATCH --error=logs/evaluation-happypose-1h.err
#SBATCH -C v100-32g
#SBATCH --nodes=1                    # on demande un noeud
#SBATCH --ntasks-per-node=4          # avec une tache par noeud (= nombre de GPU ici)
#SBATCH --gres=gpu:4
#SBATCH --cpus-per-task=10
#SBATCH --hint=nomultithread
#SBATCH --account zbb@v100
#SBATCH --time=04:00:00

## load Pytorch module
module purge
module load anaconda-py3/2023.03
conda activate happypose_pytorch3d

cd happypose

python -m torch.distributed.run  --nproc_per_node gpu -m happypose.pose_estimators.megapose.scripts.run_full_megapose_eval coarse_run_id=coarse-rgb-906902141 refiner_run_id=refiner-rgb-653307694 ds_names=[lmo.bop19] result_id=exte_det_1posehyp detection_coarse_types=[["exte","SO3_grid"]] inference.n_pose_hypotheses=1 skip_inference=False run_bop_eval=true
